¿Cómo usar CleanShot X para grabar llamadas de Zoom?

En el mundo digital actual, Zoom se ha convertido en la plataforma predilecta para reuniones de negocios, clases en línea y colaboración en equipo. Es fácil perder detalles clave, por eso muchos usuarios graban sus llamadas de Zoom. Si bien Zoom ofrece una función de grabación integrada, tiene limitaciones: las cuentas gratuitas no pueden grabar en la nube y a menudo se requiere el permiso del anfitrión. Con CleanShot X en tu Mac, grabar llamadas de Zoom es muy sencillo, brindándote control total sobre lo que se captura y cómo se comparte.
En este artículo, explicaremos qué es CleanShot X, te mostraremos cómo usarlo para grabar llamadas de Zoom y evaluaremos sus pros y contras.
1. ¿Qué es CleanShot X?
Exclusivamente para Mac, CleanShot X ofrece captura y grabación de pantalla de primera calidad, con una interfaz elegante, herramientas potentes y uso compartido perfecto a través de CleanShot Cloud.
Las características principales de CleanShot X incluyen:
- Grabación de pantalla :Captura la pantalla completa, una ventana seleccionada o un área personalizada.
- Grabación de audio :Grabe tanto el audio del sistema (por ejemplo, el audio de la llamada de Zoom) como la entrada del micrófono.
- Herramientas de edición :Perfeccione sus grabaciones recortándolas, agregando notas y resaltando el contenido esencial.
- Captura de desplazamiento :TSnap captura capturas de pantalla de páginas enteras o documentos largos de una sola vez.
- Compartir rápidamente :Almacene rápidamente sus videos en CleanShot Cloud y compártalos sin esfuerzo con un enlace seguro.
2. Guía completa paso a paso para grabar llamadas de Zoom con CleanShot X
Repasemos una guía sencilla, paso a paso, para capturar sus reuniones de Zoom con CleanShot X:
Paso 1: Instalar CleanShot X
- Descargue CleanShot X para Mac desde su sitio web oficial.
- Después de la instalación, inicie la aplicación y busque el ícono de CleanShot X en la barra de menú de macOS.
Paso 2: Iniciar la grabación de pantalla en CleanShot X
- Ingresa a tu reunión de Zoom, haz clic en Grabar pantalla en CleanShot X para comenzar a capturar.
- Seleccione si desea capturar:
- La pantalla completa
- Solo la ventana Zoom
- Una región personalizada de la pantalla

Paso 3: Habilitar la grabación de audio
- En la configuración de grabación, habilite Audio de computadora para que se capturen las voces de Zoom.
- Cerciorarse Audio del micrófono Está activado para grabar su voz junto con la llamada de Zoom.
- En su primera ejecución, CleanShot X podría solicitarle que agregue un pequeño controlador de audio para que también pueda capturar el sonido del sistema: simplemente siga las instrucciones.
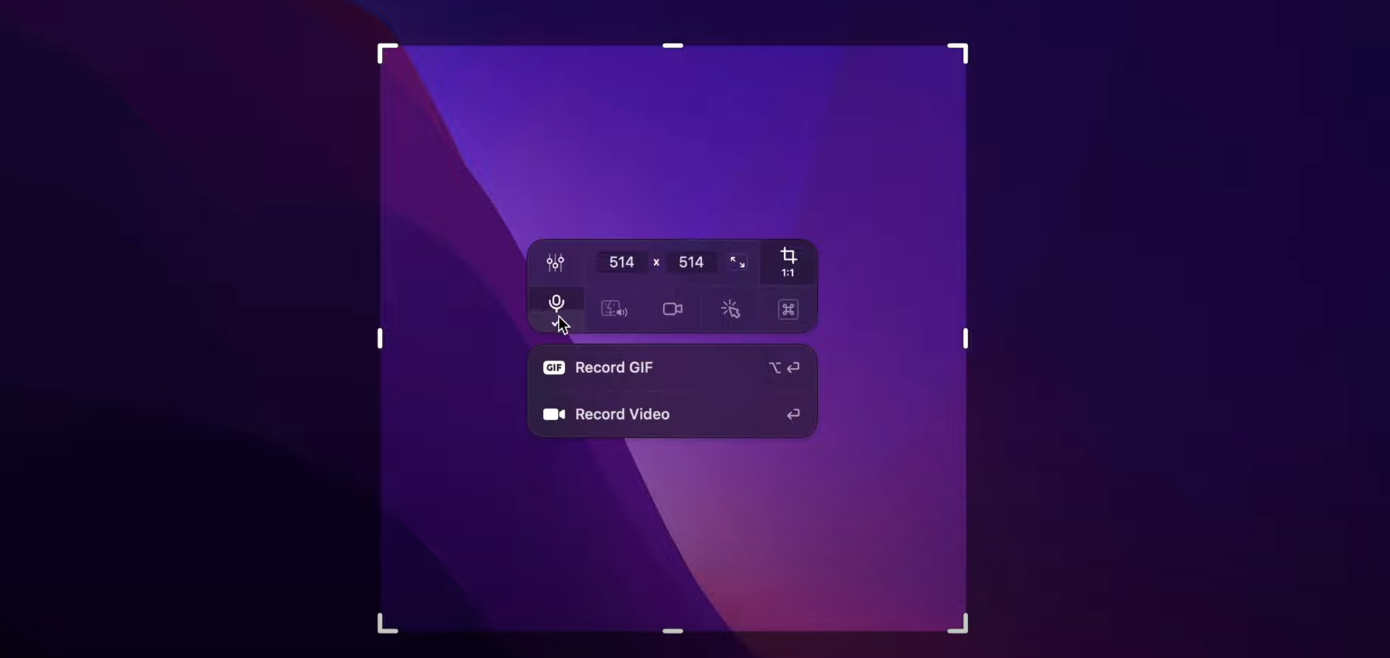
Paso 4: Iniciar la grabación
- Haga clic en Grabar video y aparecerá una pequeña barra de herramientas flotante que le permitirá pausar o detener la grabación en cualquier momento.
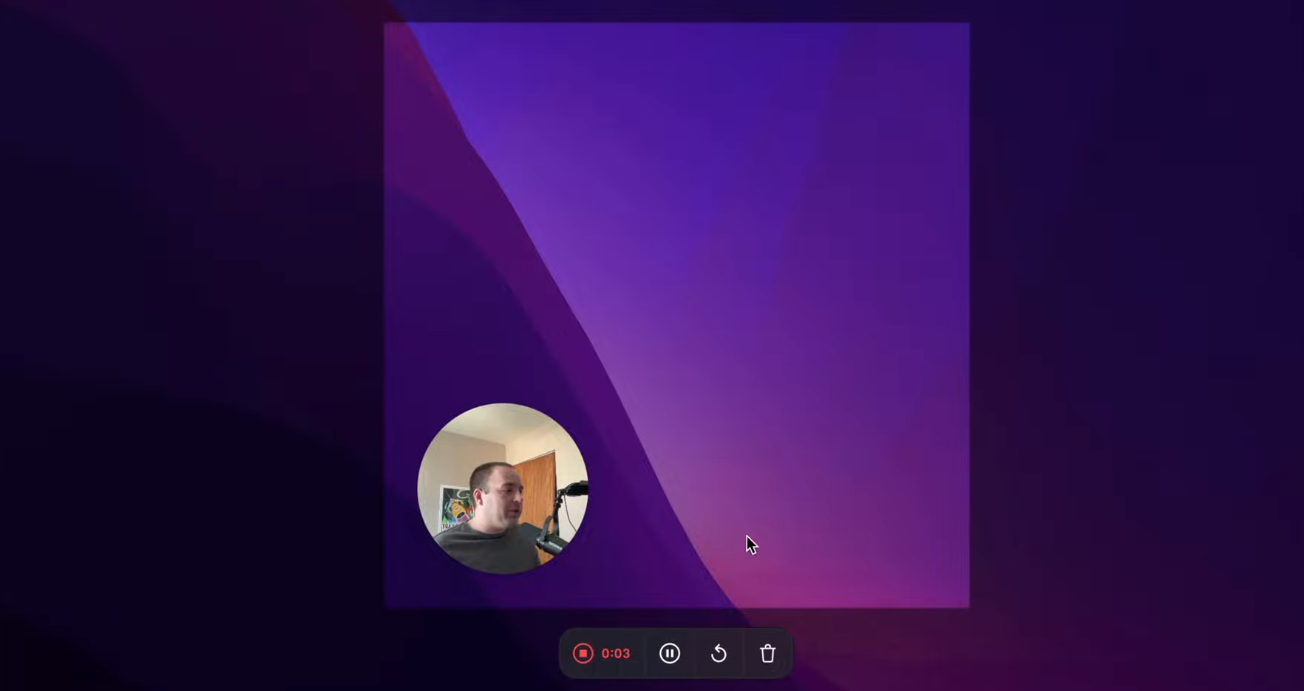
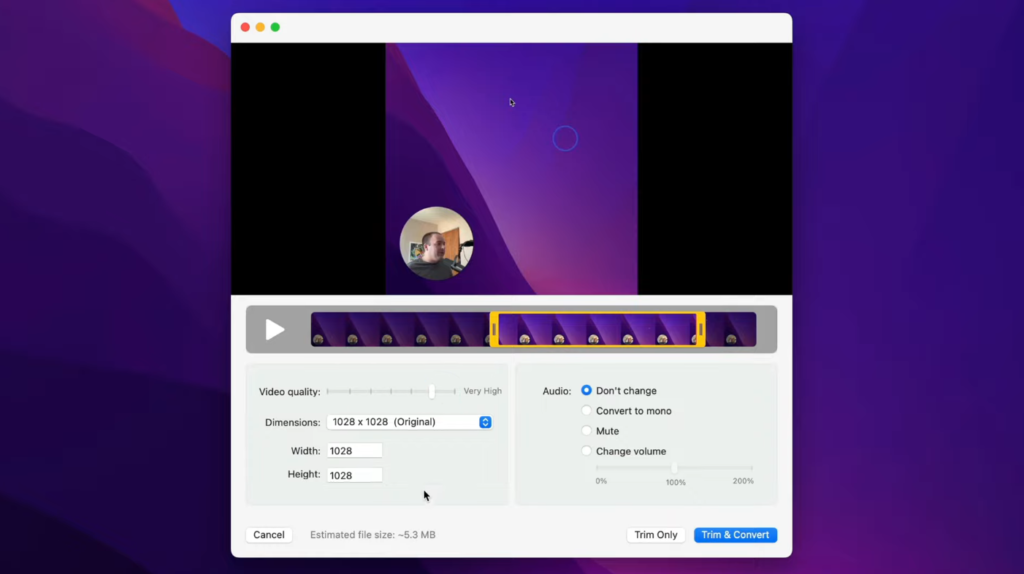
Paso 5: Guarda y edita tu grabación
- Una vez finalizada la llamada de Zoom, presione el botón rojo de parada: su grabación aparecerá instantáneamente en el visor de CleanShot X.
- Puede recortar el vídeo, anotar secciones importantes o exportarlo como un archivo de vídeo estándar.
- Después de grabar, puedes subirlo a CleanShot Cloud y compartir el enlace con colegas o compañeros de clase.
3. Ventajas y desventajas de usar CleanShot X
Si bien CleanShot X ofrece funciones potentes, también presenta algunas limitaciones a considerar. Veamos algunas:
Ventajas:
- No se requiere permiso del host – Puedes grabar llamadas de Zoom incluso si el anfitrión no ha habilitado la función de grabación de Zoom.
- Grabación de alta calidad – Personaliza la resolución, la velocidad de cuadros y las fuentes de audio.
- Edición incorporada – Recorta y anota vídeos sin necesidad de software independiente.
- Integración en la nube – Guarde y comparta todas sus grabaciones usando CleanShot Cloud.
- Herramienta todo en uno – Más allá de la grabación de Zoom, es excelente para capturas de pantalla y otras necesidades de grabación.
Contras:
- Solo macOS – Los usuarios de Windows y Linux no pueden utilizar CleanShot X.
- Software de pago – Requiere compra o suscripción; no se ofrece versión gratuita.
- Flexibilidad de audio limitada – Si bien es bueno para la mayoría de los usos, es posible que requiera una configuración adicional para una mezcla de audio avanzada.
- Límites de uso compartido de la nube – El almacenamiento en la nube CleanShot puede requerir un plan actualizado si tiene muchas grabaciones.
4. Inténtalo Swyshare Recordit En lugar de CleanShot X
Si CleanShot X parece demasiado avanzado, limitado por macOS o complicado de configurar, existe una opción más sencilla y fácil de usar: Swyshare Recordit .
Recordit Está diseñado para quienes buscan una experiencia de grabación sin estrés y sin complicaciones técnicas. Funciona tanto en Windows como en macOS, lo que lo hace accesible a más usuarios.
Por qué elegir Recordit Sobre CleanShot X:
- Compatibilidad multiplataforma :Funciona en Windows y macOS, no solo en macOS.
- Fácil de usar :Capture suavemente la pantalla, el audio del sistema/micrófono y la cámara web.
- Fotografía de alta calidad :Grabe con calidad de hasta 8K.
- Compatibilidad con múltiples formatos :Guarde y exporte grabaciones en tipos de video o audio populares.
- Ligero y confiable :Impacto mínimo en el rendimiento del sistema durante las llamadas de Zoom.
- Asequible :Ofrece precios flexibles sin el elevado coste único de CleanShot X.
Con Recordit Grabar una llamada de Zoom es tan fácil como:
- Descargar Recordit en su dispositivo Windows o Mac, luego ejecute el instalador para finalizar el proceso de configuración.
- Abierto Recordit y establecer parámetros de registro, por ejemplo, fuentes de entrada y formato de salida/resolución/ubicación del archivo.
- Seleccione el área que desea grabar en la ventana de Zoom, luego haga clic para comenzar a grabar su llamada de Zoom.
- Detenga la grabación cuando finalice la llamada y busque los archivos en Recordit Pestaña “Archivos”.

5. Conclusión
Grabar llamadas de Zoom se ha convertido en una necesidad para profesionales, educadores y estudiantes que desean repasar conversaciones importantes o compartirlas. Si bien CleanShot X ofrece una solución potente para los usuarios de Mac, presenta limitaciones, como ser compatible solo con macOS y requerir una licencia de alto costo.
Para aquellos que desean una opción más accesible, asequible y fácil de usar, Swyshare Recordit Es la mejor opción. A diferencia de CleanShot X, funciona tanto en Windows como en macOS, admite grabaciones de alta calidad, ofrece formatos de exportación flexibles y simplifica el proceso de grabación.
Para clases en línea, reuniones de negocios y proyectos de equipo, Swyshare Recordit Captura de manera confiable cada detalle, lo que le otorga nuestra recomendación como la mejor herramienta para grabar llamadas de Zoom.