¿Cómo solucionar el problema del audio de transmisión de OBS que no aparece en la vista previa?

OBS Studio is one of the most widely used tools for live streaming and screen recording. It’s free, open-source, and powerful enough for everything from gaming streams and podcasts to online classes and professional webinars. However, one of the most common and frustrating problems users face is OBS stream audio not showing up on the preview or Audio Mixer.
When this happens, your video may look perfect, but there’s no sound meter movement—meaning viewers may hear nothing on your stream or recording. In this guide, we’ll walk through step-by-step solutions to fix OBS stream audio not showing up on preview, and introduce a simpler alternative for users who want reliable audio recording without complex setup.
1. How to Fix OBS Stream Audio Not Showing Up on Preview?
1.1 Check the Audio Mixer Panel
Start by looking at the Mezclador de audio at the bottom of the OBS interface.
- If you see meters moving under Audio de escritorio o Mic/Aux , OBS is receiving sound.
- If there is no movement at all, OBS is not capturing audio.
If the Audio Mixer is missing:
- Ir a Docks → Audio Mixer and enable it.
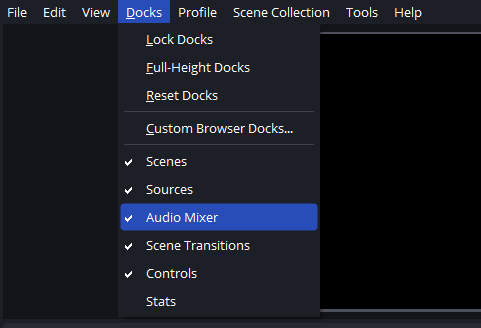
This step helps you quickly determine whether the issue is with audio input or routing.
1.2 Set the Correct Desktop Audio Device
Desktop audio (game sound, system audio, browser audio) is the most common source of missing sound.
Pasos:
- Ir a Configuración → Audio
- Bajo Global Audio Devices , set Audio de escritorio to the device you actually use (Speakers, Headphones, or Default)
- Hacer clic Aplicar and restart OBS
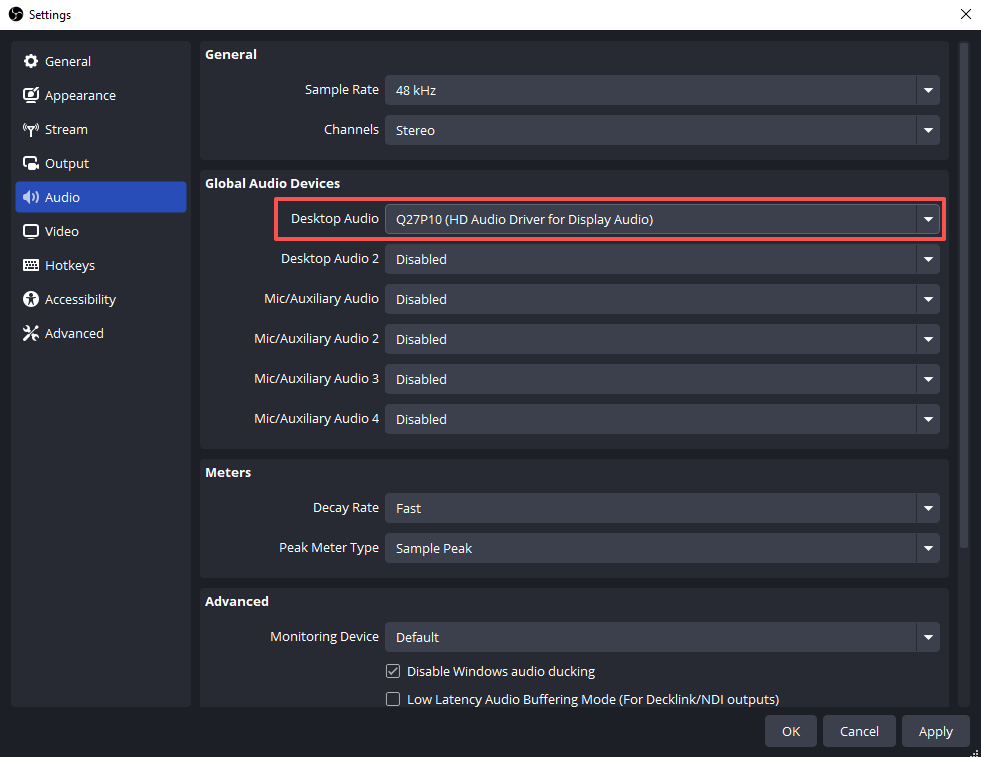
A frequent mistake is using headphones while OBS is set to speakers, which results in no audio appearing in the preview.
1.3 Configure the Correct Microphone Input
If your voice is not showing up:
- Abierto Configuración → Audio
- Colocar Micrófono/Audio Auxiliar to your active microphone
- Speak into the mic and watch the Audio Mixer
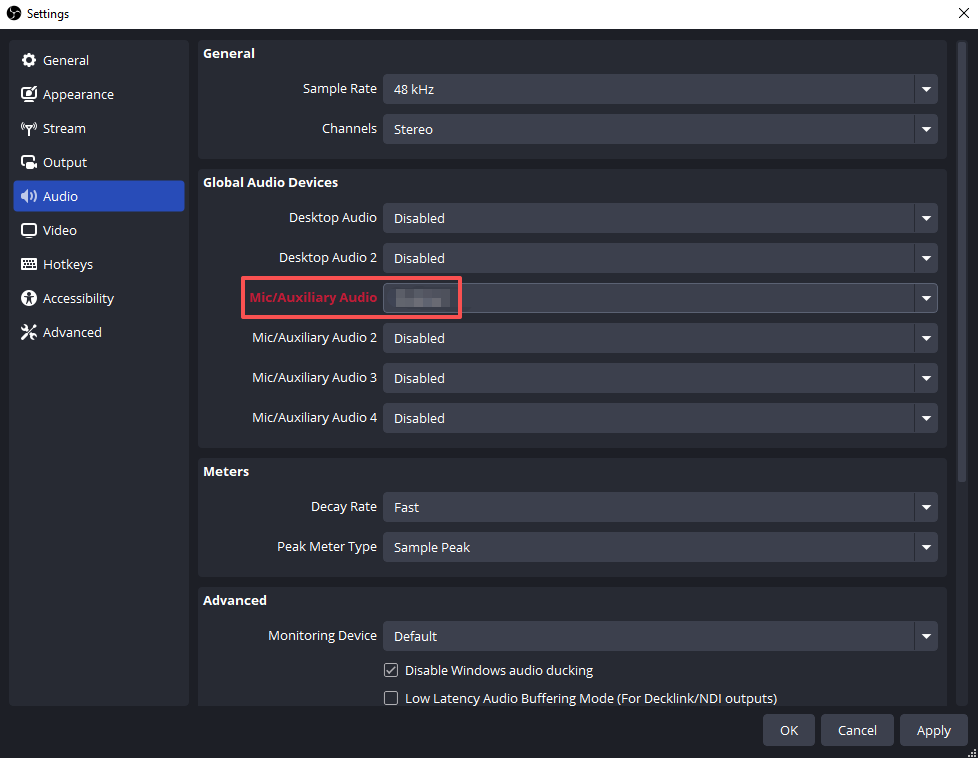
If there’s still no movement:
- clic derecho Mic/Aux in the Audio Mixer
- Seleccionar Propiedades
- Manually choose the correct microphone device
1.4 Check for Muted or Disabled Audio Sources
Muted audio sources are easy to overlook.
- Make sure the mute button (🔇) is not enabled
- Ensure the volume sliders are not set to zero
Then open Propiedades de audio avanzadas and confirm:
- Your audio sources are assigned to Pista 1
- Audio monitoring settings are not set incorrectly
Track 1 is used for streaming by default, so it must be enabled.
1.5 Fix Audio Track Configuration
Audio may appear in OBS but still not play on stream or preview if the wrong track is selected.
Arreglar:
- Ir a Settings → Output → Streaming
- Colocar Pista de audio a Pista 1
- Abierto Propiedades de audio avanzadas
- Check Track 1 for Desktop Audio and Mic/Aux
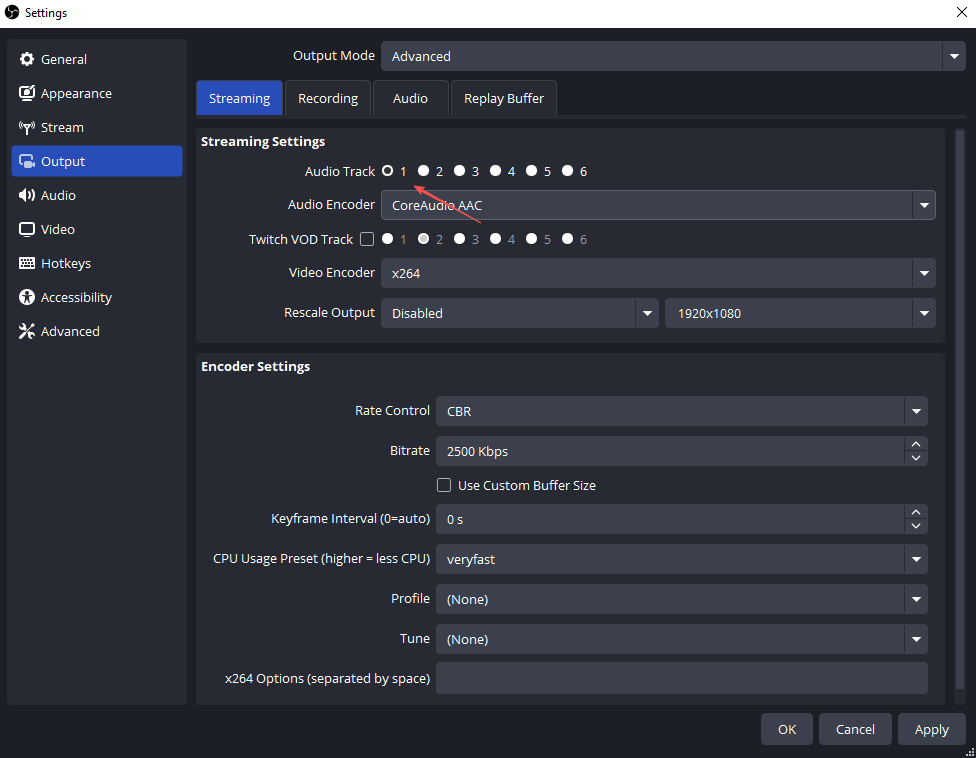
Incorrect track configuration is one of the most common causes of silent streams.
1.6 Browser and Media Source Audio Issues
If you’re capturing audio from YouTube, Twitch alerts, or embedded media:
- Open the source Propiedades
- Permitir “Control audio via OBS”
- Check Advanced Audio Properties and ensure the source is not muted
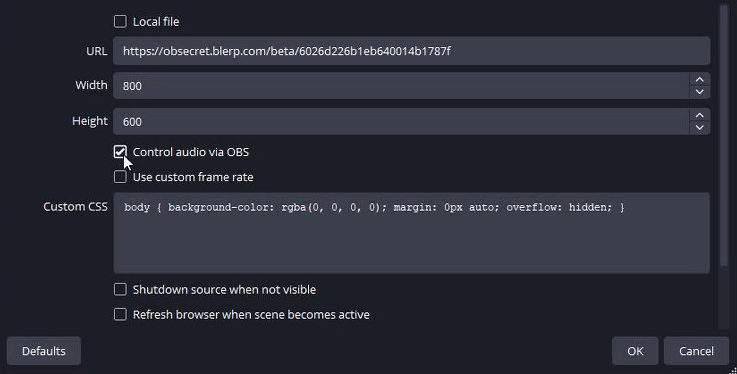
Without this option, video may appear in preview but audio will not register.
1.7 Match Sample Rate Settings
A sample rate mismatch can prevent audio from appearing.
Pasos:
- Ir a Configuración → Audio in OBS
- Set Sample Rate to 44.1 kHz o 48 kHz
- Match the same value in your system’s sound settings
- Reiniciar OBS
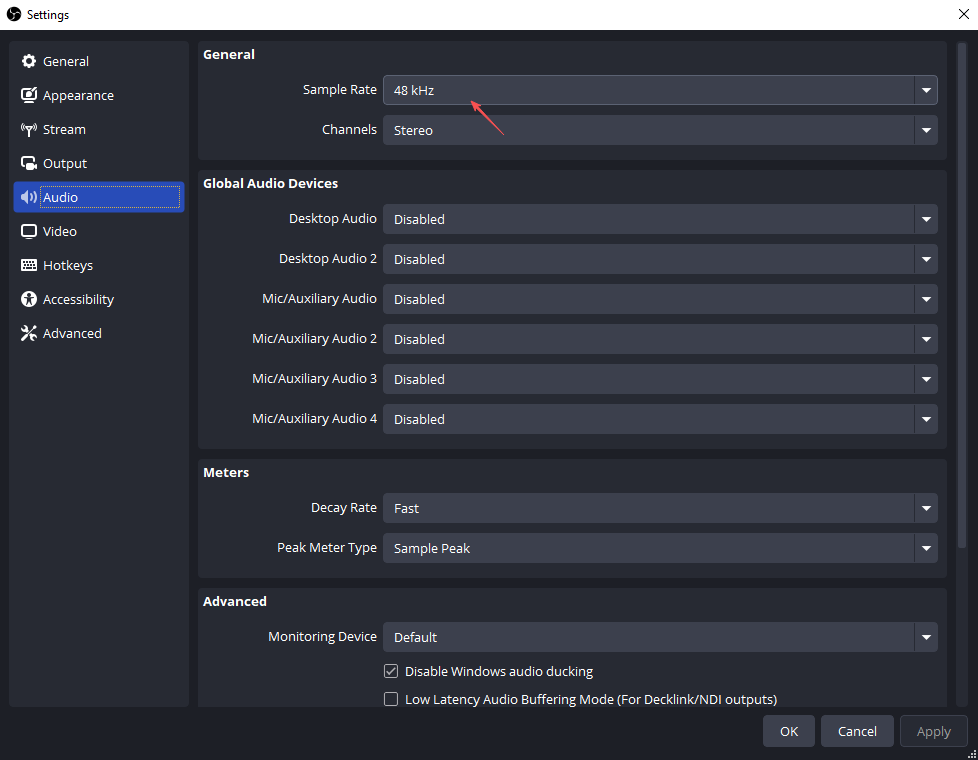
This issue is subtle but very common, especially after changing audio devices.
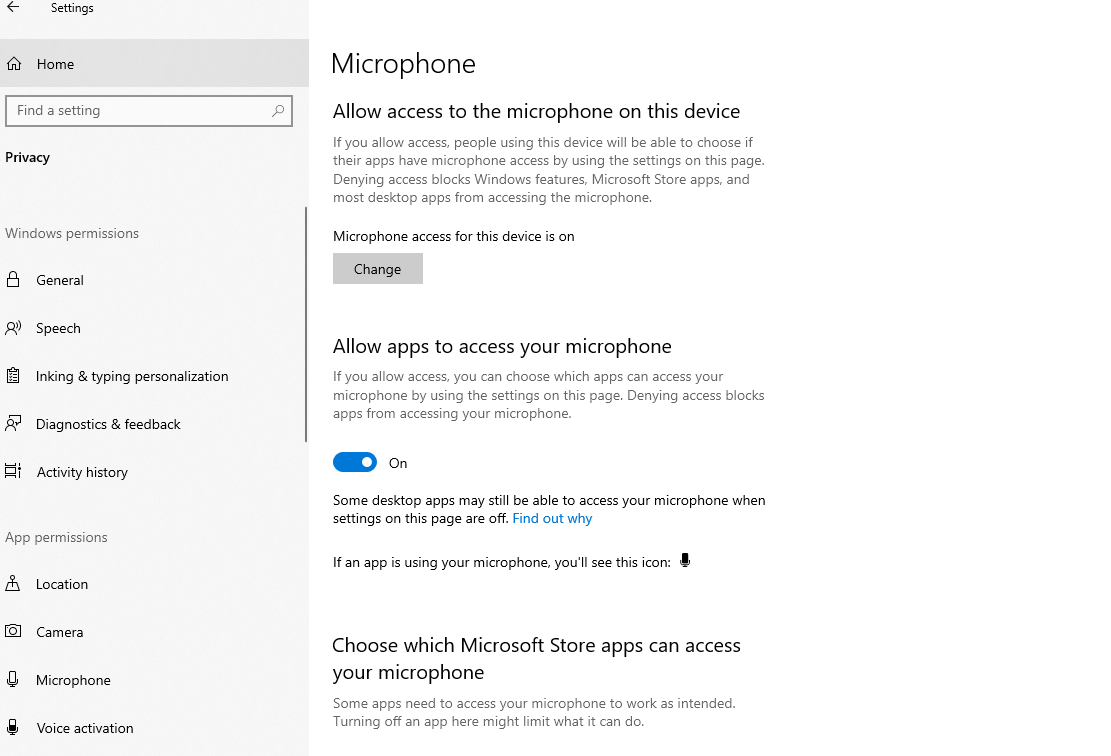
1.8 Check System Audio Permissions
Your operating system may block OBS from accessing audio devices.
Ventanas:
- Go to your Windows Settings → Privacy → Microphone
- Enable microphone access and allow desktop apps to use the microphone
- Make sure OBS is allowed
macOS:
- Ir a System Settings → Privacy & Security
- Permitir Micrófono y Grabación de pantalla access for OBS
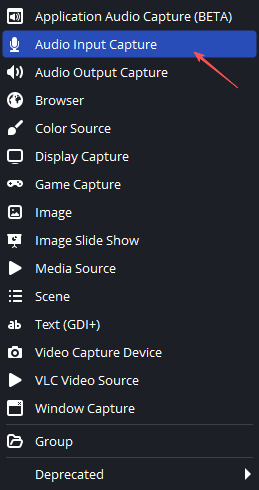
1.9 Capture Card Audio Not Showing
If you use a capture card, audio will not come from Desktop Audio automatically.
Arreglar:
- Add an Captura de entrada de audio source
- Select your capture card
- Or enable audio in the Video Capture Device properties
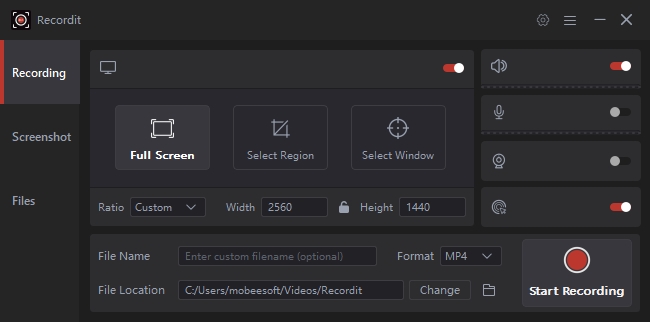
2. Bonus: Use Swyshare Recordit for Easy Audio Recording
While OBS is powerful, it can be overwhelming – especially for users who just want to record their screen with clear audio. This is where Swyshare Recordit becomes an excellent alternative.
Swyshare Recordit is a lightweight screen recorder designed for simplicity and reliability. It automatically captures system audio and microphone input without complex routing, track selection, or advanced configuration. This makes it ideal for beginners, educators, and professionals who want fast results.
Características principales de Swyshare Recordit :
- Record screen and webcam at the same time
- Capture system audio and microphone audio with clear, synchronized sound
- Schedule recordings automatically to start and stop at a set time
- Use buffer replay to save the last few minutes of unexpected or important moments
- Edit videos after recording with simple tools
- Export videos instantly in high quality without complicated settings
- Available for both Windows and macOS
How to Record Screen and Audio with Recordit :
- Descargar e instalar Swyshare Recordit on your computer, then launch the program.
- Select the recording area, enable system audio and microphone as needed and set other recording options.
- Click Start Recording to start capturing screen and sound in high quality.
- Stop recording, preview and edit the recording as needed, then export your video instantly.
3. Conclusión
When OBS stream audio is not showing up on preview, the problem is usually caused by incorrect device selection, muted sources, wrong audio tracks, or system permission issues. By carefully checking OBS audio settings, Audio Mixer activity, sample rate configuration, and operating system permissions, most audio problems can be fixed quickly.
However, if you prefer a smoother and more beginner-friendly experience, Swyshare Recordit is a highly recommended alternative. It removes the complexity of audio setup and ensures your recordings always include clear, reliable sound.
Whether you continue using OBS or switch to Recordit , solving audio issues is essential for producing professional, engaging streams and recordings.